Generators are essential tools for providing power during outages, but like all mechanical devices, they require regular maintenance.
One common maintenance task is knowing how to change the generator rope, also known as the pull cord.
This task may seem daunting at first, but with the right guidance, anyone can do it.
In this article, we will walk through the process step by step, ensuring you have all the information you need to successfully change a generator rope.

What You Will Need
To begin, gather the necessary tools and materials. You will need a new rope, which is typically a specific length and thickness for your generator model, a set of screwdrivers, a socket set, and protective gloves.
Having everything at hand before you start makes the process smoother.
Safety Considerations
Safety is paramount. Make sure the generator is off and cool to the touch before you start. Work in a well-ventilated area to prevent inhaling any potentially harmful fumes.
It’s also wise to remove any jewelry or loose clothing to prevent them from getting caught in the generator’s parts.
How to Change a Generator Rope?
Preparing the Generator
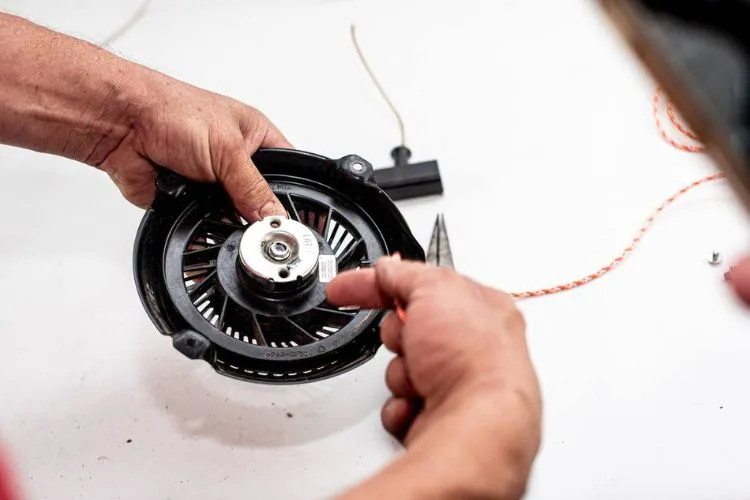
First, access the pull cord mechanism. This usually involves removing the generator’s outer housing. Keep track of all screws and parts you remove; you’ll need to reinstall them later.
Removing the Old Rope
Carefully unwind the recoil spring tension to avoid it snapping back suddenly, which can cause injury. Once the tension is released, you can remove the old rope.
Pay close attention to the way it was installed, as you’ll need to install the new rope in the same manner.
Attaching the New Rope
Choose a rope that matches the length and thickness of the old one. Thread the new rope through the same path as the old one and secure it to the recoil pulley.
Tie a secure knot at the end of the rope to prevent it from pulling through the pulley.
Rewinding the recoil spring may require patience. Wind the spring in the correct direction, making sure to maintain tension so the rope retracts correctly when pulled.
A pro tip here is to keep a firm grip on the pulley to prevent the spring from unwinding abruptly.
Reassembling the Generator
Replace the housing and any other parts you’ve removed. Make sure everything is secure and in place, to ensure the generator operates safely.
Testing the New Rope
Once you’ve replaced the rope and reassembled the generator, it’s time to test it. Pull the rope gently to make sure it retracts smoothly.
This is also a good time to check that the generator starts as expected.
If the rope doesn’t retract or the generator doesn’t start, you may need to adjust the tension or check that the rope is correctly installed.

Maintaining Your Generator’s Pull Cord
Regularly inspect the pull cord for wear and tear. Store your generator in a dry, covered area to prevent the rope from becoming damaged by the elements.
Proper storage and maintenance can significantly extend the life of your generator’s pull cord.
Common Mistakes to Avoid
Avoid these common mistakes when changing generator ropes:
- Not releasing tension properly: Failing to safely release the tension in the recoil spring can lead to injuries or damage. Ensure the spring is completely unwound before proceeding.
- Incorrect rope specifications: Using a rope that doesn’t match the generator’s requirements in thickness or length can lead to quick wear or malfunction.
- Skipping safety precautions: Forgetting to wear protective gloves or to work in a well-ventilated area can put you at risk.
- Losing parts: Not keeping track of small parts like screws and washers during disassembly can cause reassembly issues.
- Incorrect winding: Winding the recoil spring in the wrong direction or not maintaining adequate tension can prevent the rope from retracting properly.
- Rushing the process: Rushing through the steps without paying attention to detail can result in having to redo the work or, worse, causing damage.
Taking care to avoid these mistakes will lead to a smoother and safer rope replacement process.
User Experience and Recommendations
Many users highlight the importance of patience, especially when dealing with the recoil spring mechanism.
One user shared that applying gradual pressure helped maintain control over the spring’s tension, preventing it from snapping back.
Another recommended checking the compatibility of the rope with the generator model beforehand to avoid mismatches.

Regular practice and adherence to safety measures were also commonly suggested, emphasizing careful and methodical handling throughout the process.
These stories underscore the effectiveness of diligent preparation and the value of learning from previous experiences.
Frequently Asked Questions (FAQs)
How long should a generator rope be?
The length varies by model, but typically it’s between 2 to 6 feet. Consult your generator’s manual for the exact length.
What kind of rope should I use for my generator?
Use a durable, nylon rope that matches the thickness and length of the original rope.
How often should I replace my generator rope?
Inspect the rope annually and replace it if you notice fraying, wear, or if it becomes brittle.
Can I repair a frayed rope instead of replacing it?
It’s best to replace a frayed rope entirely to ensure your generator functions properly and safely.
What should I do if my generator’s pull cord won’t retract after I’ve changed the rope?
This could indicate that the spring tension isn’t properly adjusted. Remove the housing and check that the spring is wound correctly and that the rope is properly threaded.
Conclusion:
Changing a generator rope is an essential skill for anyone who relies on a generator for power.
While it may seem complex at first, following these steps will help ensure a successful replacement.
Regular maintenance and prompt replacement when needed can keep your generator in top working condition, ready to provide power when you need it most.
